Tuesday, December 18, 2012

Modify U-boot Configuration in Linux User Space!

Have you ever thought to change the U-boot settings once, after you got the Linux console? Well, you might be thinking to entering into the U-boot setting prompt to do this. But there is a beautiful method already exist to achieve this operation!

Well, here I'm not giving anything from the sky or vanishing anything like a magician, but trying to show a Utility tool (you can't say exactly it's a tool, better it can be consider as one option ;) ) which already available :0 .

All you have to do is, to try some geeky way (though very simple) only at once and do the magic always.
The key tool which you have to enable is "fw_printenv" from the U-boot.

Follow the below steps to make the wonders in U-boot from your own lovely Linux console ;)

  1. Step 1: Generate the "fw_printenv" utility tool in U-boot
    • give 'env' (optional parameter) in u-boot and compile it. Be patient for the compilation ;)
    • The above step generate the 'fw_printenv' in the U-Boot directory tools/env 
    • Copy the 'fw_env.config' file too.
  2. Step 2: Well, we copied, but where to paste it ! Follow the steps ;)
    • Copy fw_printenv to /sbin on the root file system of your own board.
    • The interesting thing here is that the fw_printenv binary also contains the code for fw_setenv. The functions of fw_setenv are run when the program is invoked with the name "fw_setenv". this is most easily accomplished by creating a symbolic link from fw_printenv to fw_setenv, as in "ln -sf /sbin/fw_printenv /sbin/fw_setenv"
  3. Step 3: Create config file for the utility, in order to take place the action.
    • Remember, you copied 'fw_env.config' from 'u-boot/tools/env/' path? But you didn't play with it yet right? ;) Well, this is the right time for that! All you have to do is, copy the fw_env.config into /etc path. Finished? Relaxed? No...remember, this is a geeky professional way dude ;)
    • Open the 'fw_env.config' and make required changes related to env size, flash sector size and number of sectors according to flash which you are using. You have to change the fw_env.config with respect to your system modification rather than simply putting it into /etc. you can easily check this from /proc/mtd.
Once you configure the appropriate values in fw_env.config, then rest of the stuffs are pretty easy.
From the Linux console, you can print the u-boot setting by giving the fw_printenv where as with fw_setenv , you can edit the u-boot settings!!! Easy right?

Well, I would like to share two good web links also for your better understanding..
  1. U-boot environment variable in Linux
  2. U-boot environment
Do experiments...create wonders...Happy coding...

Monday, October 22, 2012

Astyle: An Artistic way to Style your code!


 "Debugging is twice as hard as writing the code in the first place. Therefore, if you write the code as cleverly as possible, you are, by definition, not smart enough to debug it."
- Brian W. Kernighan.

Many programmers like me always struggle, not to find a solution, but to format a code!
As programmers, we only find a 'space' and/or 'tab' button when formatting or indenting come into mind. This is true and we always practice it. Some heaven editors might be contain an inbuilt spacing adjustment too. But do these all so called solution give a proper result (of course, our satisfaction) ? The answer might be a long NO...because, most often, the real problem comes when the code has to migrate from one editor to another since, there is no strict Universal formatter rule followed by any editors. 
Astyle (Artistic Style) is a 'God's own hand' solution to this problem. Artistic Style is a source code indenter, formatter, and beautifier which currently supports C, C++, C# and Java programming languages.
 Artistic Style, actually a filter written in C++ that automatically re-indents and re-formats C / C++ / C# / Java source files. The main advantage of astyle is that, it can be used from a command line, or it can be incorporated as classes in another C++ program upon the use.

How to get astyle?


Well, the answer is very simple, just download and install it;)
The latest release can be downloaded from the SourceForge file releases page. A link to the "latest version" near the top of the page will download the correct package for your platform. Or you can select the appropriate package from the "astyle" release folders. The Windows package contains a compiled binary. Other platforms will need to compile the source code. Makefiles are included for the most popular compilers. Follow the install instructions for the appropriate platform as described in the "Install" documentation.
For Ubuntu users,just get it via terminal by,

apt-get install astyle                                                                                                                             

Once it installed properly, then rest of everything is pretty easy.

How to format with astyle?

  1.  The first and foremost step is to right a small program (without code, where we will format? :P). I wrote a ugly program in vim editor (one of my favorite editor). Examples hence with the same. But the procedure to run the astyle is almost similar and simpler in all variants. Do it according to your platform.
    Sample program at initial stage without applying astle
    Please note that, I made the sample program as ugly as possible just for the insight to astyle working. Don't mistaken me that it is my usual way of coding ;)
  2. Once the coding getting over, the next step is to beautify the code (usually we should do normal indentation while coding itself, but nothing to worry here even if you missed out this, because astyle is always free to help you).
    Astyle can be running either from a terminal or as class. Here, I'm trying it from the terminal itself. Astyle can be run as follows
    Astyle formatting
    Here, sample.c is the filename. Once you run the astyle with the corresponding valid file name, you will get the notification that it is formatted successfully in the terminal itself(next line). If you again run the same file which already formatted, then it will show no changes instead of formatted.
  3. Our sample program is formatted successfully! open the program and see the difference...
    Code after astyle format
Pretty nice, isn't it? That too with just a command line step!
Note that the astyle will indent and format the code automatically with the ANSI standard. You can specify the standard and can use many inbuilt features by using the 'help'.

Astyle will not format the comment lines since it users only freedom area to express the meaning of what they are doing here ;) . So remember when do coding and taken a care about the comments. Rest of master pillars will be taken care by the Astyle...

Happy coding...


Thursday, August 16, 2012

Splint: A better Static Analyzer for Embedded Linux!

“Since human beings themselves are not fully debugged yet, there will be bugs in your code no matter what you do.”
-Chris Mason, Zero-defects memo (quoted in Microsoft Secrets, Cusumano and Selby)
Most of the programmers usually think that the code is perfect, once it complied without returning any warning or errors. Are you one among them? Well, this assumption won’t help you always, especially when you play with C language. Since ‘C’ is an imperative (procedural) systems implementation language, it more closed to the system memory and low-level architecture. So, if doing something wrong with memory, which will directly affect the whole system in fact! Well, a static code analyzer like “Splint” can point out these defects especially in Embedded Linux.
Introduction
In embedded system, almost all programs have to run “24x7” continuously! This makes sense about the efficient usage of the system memory. If a particular application unnecessarily taking considerable amount of memory, then this will probably cause for the “system crash”.
Linux is made up of ‘C’ so that when it comes to the Linux programming in embedded, an extra care should be required in memory consumption as well as coding efficiency. A typical compiler will only check the typo-syntactical errors but never check where the memory leak is occurring. Here comes the importance of specially designed tools for static code analysis.
“Splint (Secure Programming Lint)” is a tool for statically checking C programs for security vulnerabilities and programming mistakes. Splint becomes “handy” when it comes to the embedded world, especially dealing with Linux.
The advantage of splits includes but not limits to the following 
  1.  Ability to interpret special ‘annotations’ to the source code, which gives it stronger checking than is possible just by looking at the source alone. Annotations are stylized comments that document assumptions about functions, variables, parameters and types. 
  2. Splint is “cross- platform” tool so that it can use in both x86 and ARM architecture machines. 
  3. Better customization to select what types of errors are reported using command line flags and stylized comments in the code. 
  4. Full freedom to the user. Users can define new annotations and an associated check to extend Splint’s checking ability. 
  5.  Splint can check the infinite loop problem that couldn’t able to do by a run-time checker such as ‘valgrind’. 
  6. Splint is free software released under the terms of the GNU (General Public License).
Ideally speaking, Splint can be use in almost all C programs and can find the bugs in user specific manner. The common (some of them can be find only with splint!) problems that can be fixed through the Splint are listed below.
  1. Using possibly undefined storage or returning storage that is not properly defined.
  2. Violations of information hiding.
  3. Dangerous aliasing.
  4. Problematic control flow such as likely infinite loops, fall through cases or incomplete switches, and suspicious statements.
  5. Dangerous macro implementations or invocations.
  6. Violations of customized naming conventions.
  7. Buffer overflows vulnerabilities.
  8. Modifications and global variable uses that are inconsistent with specified interfaces.
  9. Memory management errors including uses of dangling references and memory leaks.
  10. De-referencing a possibly null pointer.
  11. Type mismatches, with greater precision and flexibility than provided by C compilers.
How to start with Splint?

Well, the answer is very simple. The best way to learn to use Splint, of course, is to actually use it. The splint can be run by simply putting
Splint *.c
Where *.c means that you can list out more than one C file with splint. Splint alone normally show many warnings. So its up-to the user to taken care about all those, else one can suppress the warning by providing a suitable “flag”.
A typical example:

The following code snippet just check the different characters which entered by the user. Though the initial ugly code is vulnerable, it not returns any error when it compiles!
initial code snippet
Splint can be run by splint file_name.c, where the ‘file_name’ contains the above code.
The splint’s output for the above code snippet shows below.
splint’s output
The splint’s warnings are highlighted in yellow colour for better understandability. Splint won’t fix the above vulnerabilities by default. User should take the decision and fixed it by applying the patches.
The below code snippet shows fixed source code. Please note that, this code is just for explaining the use of splint but not for the functional meaning.
fixed code snippet
Conclusion
Splint is a very powerful tool for static C code analysis. Since splint is cross platform, it can be efficiently use in embedded systems that mainly deal with ARM architecture .Though splint shows much kind of warnings and errors, it’s totally up-to the user to taken care and fixes it.
Learn the splint; play in embedded world, that too with free of cost!
Find more in Splint manual

Monday, July 23, 2012

Significance of Microsoft Surface tablet!

The Linux enthusiastic may wonder why I mentioned about Surface, that too from the Microsoft!!!
But here, I'm thinking something differently according to (or may towards to ) the Linux world.

Microsoft Surface Tablet
 Millions of tablets are launching even in a single day(I'm not sure about it actually ;) ). Then why I'm mentioned Surface particularly? The answer is very simple and straight forward. This is the first tablet coming from the 'Operating System giant', Microsoft, with their own hardware specifications. Microsoft already have many other hardware product such as xbox360 etc. but, this is something interesting. Surface indirectly telling the world that, the software "alone" cannot survive in the market( I specifically mean only in Market, not in the world) .
Microsoft usually "sell" their OS alone with a huge market share. All most all humans once lived only with Windows OS (even if they don't have a window in their own home :D ). But the evolution of Linux changes the life. When Linux become more user friendly and GUI rich, the normal people start playing with it. Now all most all corner of world, you can see a Linux based product!
The world of Linux is different. It always comes with free stuffs and even the OS too. Each and every product based company (even a single human) can decide what and all required for their usage. It will become handy when comes to the world of Smart devices such as smart phones and tablets.
The era of smart devices starts with Apple, that too with their own hardware specification. Apple never 'sell' their OS, in fact it will come with their product , That means the OS is free, isn't it? But I really don't know how many of us agree that Apple can be consider as a Linux(at least Unix) kind.
When Google acquired Android Inc. on August 17th 2005, No one imagine that Android become the next world, even Microsoft.
Now according to the statistics, majority of the mankind is with smart devices rather than PC. More over, the 70% of smart devices are currently running with the Linux flavor! This might be the fact that change the Microsoft's perspective thinking. Now they released the Microsoft Surface, which is the first tab with Windows 8 Operating system. Here, if you ready to purchase the surface, you will get the OS as free! that means the OS is becoming free with the product isn't it?

Is it mean something? well I believe yes, because I like the Open source motto and these all changes are leading to the Open source philosophy. After all, this is my view about the Surface. You absolutely can think in different way, because I always like freedom ;)

Sunday, July 8, 2012

Cross Compiler: A Better Understanding...

Cross Compiler:

According to Wikipedia,"A cross compiler is a compiler capable of creating executable code for a platform other than the one on which the compiler is running. Cross compiler tools are used to generate executables for embedded system or multiple platforms. It is used to compile for a platform upon which it is not feasible to do the compiling, like microcontrollers that don't support an operating system." Well, one working in embedded system knows all these stuffs, just because of the fact that, without the cross compiler, they can't exist! 
Cross Compiler - An easy concept

Cross compiler is a very simple yet powerful idea that actually making the life easier nowadays. For example, The one who reading this blog probably have a smart phone,haven't you? Do you ever think how the stuffs working in your phone, that too directly after downloading the stuffs from Internet? (Please note that i mention "stuffs" which means that the programs or applications which you downloading to your phone, nothing else! Those application might have a PC version also ). The answer is pretty simple. Those stuffs are already cross compiled and you downloading the binary(executable file) of that stuffs.

How the idea works?

In-short, the idea is very simple. You can write a pretty nice program(probably a good application) with your so friendly 'C' language(or any other language) in the Terminal of Linux Host PC. You can compile it with the help of a already installed cross-compiler. Note that the cross compiler should be cope-up with the Board(say, the Smart phone platform) which you using. Once the compilation is over and generated the binary(executable file), the first step is over!
Next you have to run it in your Board. There are plenty of ways to run the binary file in your board. Select the suitable one(either from external storage devices or NAND/NOR flash) according to your board. You can connect a better debugger cable(probably a UART cable) from your board to Host PC for debugging. You can notice everything while booting as well as running your application on the board, through "minicom", in Host PC(if you connected your Board to Host PC, via UART cable).

A Typical Example with Step by Step Procedure:

The following steps tell you how to run a binary in ARM(the most usable architecture in Embedded system) Board. The steps here are just for example. This can be vary from one board/application to another.
  • Write a program using a suitable editor(say, vim editor).
          Example: # vim appfile.c
  • Cross compile the application by using the specified tool chain(say, arm tool chain).
          Example: # arm-none-linux-gnueabi-gcc appfile.c -o output_binary
         Note: output_binary is the binary file which will run on the board. 
         The output_binary doesn't have any extension. 
         Make sure that, the cross compiler tool chain(say,arm)is pre-installed in the host PC and it 
         have super privilege mode.
         To give the super user privilege mode, use the following command.
         #  sudo su [Enter]
   [type your password]
  • Type # cat /proc/partitions for checking the currently available devices.
  • Insert SD card (through a card reader) and check the newly added device name(SD card reader) by typing
          cat /proc/partitions
  • Type # mount command to mount the SD card. It will give the partition details. Usually, SD card partitioned into Windows(vfat) as well as Linux(ext2).
  • Consider the Windows partition(vfat) by
          # /media/8CB9-D779 where  8CB9-D779 is the partition name.
  • Copy the binary file to the Windows partition of the SD card.'
          Example: # cp output_binary /media/8CB9-D779
  • Type "sync" to forcefully flush and copy the content. It will become handy to check copy process completed or not.
          # sync
  • Unmount and remove the SD card and insert it into the board.
  • Open "minicom" and configure it by the following settings
          # minicom -s

          Note: 1) Device name should be appropriate. Say, "ttyS0" for UART and "ttyUSB0" for 
                        USB-UART cable.
                   2) Hardware controller flow preferably set to "NO"
                   3) Save the configuration as dfl file.
                   4) Type ctrl A+X to reset and initialize the minicom.
  • Switch on the Board, you can see the Booting in minicom. After booting , minicom will come up with a '#' symbol (console indication where you can type the commands).
  • Type mount command inside the minicom to mount the SD card and check where it mounted(say, /mnt/card). View the device name(say, /dev/mmcblk1p1) and mount it to the particular area as
         # mount /dev/mmcblk1p1 /mnt/card
  • To view the contents of the SD card, type
           # cd /mnt/card and after that
           # ls or ls - l
  • Choose the binary file(say, output_binary) and run it(as application) by
          # ./output_binary
          That's it! Your application start running on the board!
          Note: The SD card probably not be the primary one which contain the uImage of Linux kernel. 
          Better to use secondary SD card for running the application.

Happy coding...Happy Life...

Tuesday, July 3, 2012

It’s the time to speed-up your code with "gprof"


Abstract:

"Perfect in performance" will be a challengeable task, even may be a nightmare to the 
application developer! As per the studies, most of the developers put their much effort to find out
where their code lags…
Profiling allows you to understand where your program spent its time and which functions called
which other functions while it was executing. It can also tell you which functions are being called
more or less often than you expected.  This information can show you which pieces of your
program are slower than you expected, and might be developers for rewriting to make your
program execute faster. This may help you spot bugs that had otherwise been unnoticed also.
Meet "gprof", a free profiling tool provided by GNU Foundation and experience how you can
change your nightmare to "noon-hallucination”!

Introduction:

"Embedded system" always demands performance first than anything else. No matter how 
complex or simple the application may, but performance will give an up-stand to that in the 
market. This may be the primary reason, why every developer spending lot of time to make 
codes perfect than write a code!
But, the process of making a code perfect is not easy as you might think when it comes to
manual correction. Most efforts become equivalent to counting the stars on the sky, when the 
reason behind the execution lagging is unknown.
It is therefore very clear that a tool, which can go inside the code and find out the real factors 
behind lagging, can help in vast. “Code-profiling” does this and gprof is a good tool to start 
with…

How to start with profiling?

gprof profiling can be enable by add -pg to the gcc compile flags. 
Example as follows:

gcc test.c -pg -o test -O2 –lc

Once the program is compiled for profiling, you must run it in order to generate the information 
that gprof needs. Once you have built the application, simply run it as normal, using the normal 
arguments, file names, etc. as follows:

. /test 50000

The program should run normally, producing the same output as usual. It will, however, run
somewhat slower than normal because of the time spent collecting and the writing the profile 
data.
Once this completes, you should see a file called gmon.out created in the current directory.
In order to write the "gmon.out" file properly, your program must exit normally, by returning 
from main or by calling exit. Calling the low-level function _exit does not write the profile data, 
and neither does abnormal termination due to an unhandled signal.

Interpreting gprof’s Output:

gprof can produce several different output styles, the most important of which are described 
below.

1. The Flat Profile:

Flat profile can be obtained with the gprof command, passing the executable itself and the 
gmon.out file as follows:

gprof test gmon.out -p

The flat profile shows how much time your program spent in each function, and how many 
times that function was called. If you simply want to know which functions burn most of the 
cycles, it is stated concisely here.
Output:

2. The Call Graph:

The call graph shows, for each function, which functions called it, which other functions it 
called, and how many times. There is also an estimate of how much time was spent in the 
subroutines of each function. This can suggest places where you might try to eliminate function 
calls that use a lot of time.
"Call graph" can be obtain as follows:

gprof  test gmon.out -q

Output:

Conclusion:

"gprof" is free yet very powerful profiling tool for optimizing your code. Profiler uses 
information collected during the actual execution of your program. So, it can be used on 
programs that are too large or too complex to analyze by reading the source. However, how your 
program is run will affect the information that shows up in the profile data. If you don‟t use some 
feature of your program while it is being profiled, no profile information will be generated for 
that feature.
One of the main advantages of gprof over the other profiling tools is that gprof will be common 
in Linux machine and it preinstalled with "gcc" in most of the system.
What are you waiting for then? Get the advantage of the free GNU profiler from today. Life 
makes easy…


Find more about gprof on GNU gprof manual:


Oracle VM Virtualbox: The First Step To Try Your Linux Skills

A little introduction

Well, I'm mainly here for sharing what I have(a bit knowledge ,nothing else like money etc :) ). The people always say that they have to try the so called Open source! but the actual problem comes when once they enter into it!. Some of them couldn't find anything better over there where as others don't find a way back to their pretty preserved Windows.
Today, I'm going to explain about the heavenly solution for this - Oracle VM VirtualBox! I'm really support the GNU founder Richard Stallman, so that, this article contains free stuffs,including the article itself!.
I'm demonstrate you how you can install Ubuntu 12.04 LTS (Precise Pangolin) inside VirtualBox. I'm using Windows 7 professional as my host PC(this is not free in fact). The procedure is same for all the OS which you have to try with VirtualBox.

Pros and Cons 

The advantages of using VirtualBox for your Linux is as follows:

  1. You will get access to your Host PC's OS(say windows 7) as well as your virtualBox OS(say, Ubuntu) at the same time. This will give the flexibility to the user.
  2. Most of the Internet dongles comes with an .exe for the setup. But his will not help you to setting up the connection in Linux machines. In VirtualBox, you can select the bridge option so that the Host's network will be shared by the VirtualBox's OS. pretty nice idea right?
  3. VirtualBox always create a virtual disk(usually of 8GB size) of your entire OS. So that, you can easily port the entire OS to other machines too using VirtualBox.
Every coins give us either head or tail. Likewise VirtualBox have the following dis-advantages too:
  1. Speed is pretty low as compared to "real installation". If you are using a higher-end computer, you can fill this gap.
  2. The OS libraries (from Host's OS and VirtualBox OS) clash sometimes, especially when we search or cracking the libraries. Changing the VirtualBox disk from the primary partition help to prevent this issue. 
  3. you can not use all the ports which available in the Host PC to VirtualBox.

 So, it's totally up-to the user to select the OS installation(but Linux is must,mind it :) ).

How I can Install the VirtualBox?

VirtualBox is free(hope always...) and you can easily download it from the following site.
Select a suitable one(in our case, Windows 7 .exe file) and follow the instructions. It's pretty easy to install so that, I'm not given the steps over here. Once you installed the VirtualBox, then follow the below steps to install the Ubuntu in Windows 7, using VirtualBox.

Configuring the VirtualBox with new Virtual Disk 


After the "sucessful" installation, double click on the Oracle VM virtualBox icon. This will open a typical Oracle VM VirtualBox manager window.
     2.

Click on the "New" button of Oracle VM Virtual Manager window.
     3.

This will open another window. Click next button.
    4.

A option window with VM Name and OS type appeared. Here you should give the name of your VirtualBox OS and type of your OS. In our case, I given the name as "Ubuntu 12.04" and operating System as Linux. Version you can select as Ubuntu from the drop down menu. after completing the fileds, cleck next button.
    5.

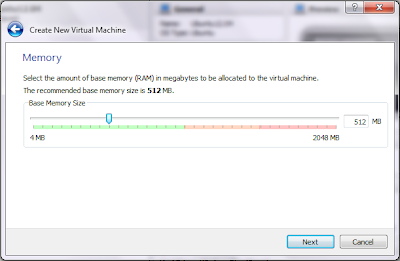
This step is pretty tricky. most of the people don't know how to select the Memory for their needs. Well, for better result, take the default setup which appeared on this window first. You should allocate 1/4th of the actual RAM size of your Host PC. That means if you have a RAM with 2GB of size, you should allocate the VirtualBox memory as 512MB only. In otherwords, if you want to allocate Memory as 1GB in VirtualBox, then you should have a 4GB RAM in your Host PC.
Click next,once you decided with the suitable memory.
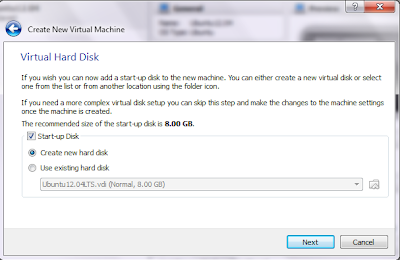
    6.

If you are going to make the VirtualBox OS at first time, then click on the Start-up Disk option. Select "Create new hard disk" Click next.
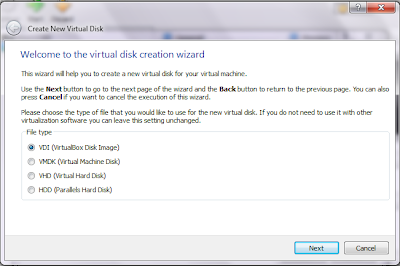
    7.

Select the first option, "VDI(Virtual Disk Image)" as file type and click next. This will help you to create a new Virtual Disk.
    8.

The next option is to select the type of allocation. In our case, I would prefer the second option, "Fixed size". Though fixed size allocation method takes time, this is a best method to avoids frequent system crashes.More over, we trying to perform our skills on this OS! so chances for the system crash is obvious :)
Click next after you select the second option.
    9.

The next window open with Location and size(again size? oh no...). Well in this window, you can enter the particular location where the virtual disk has to be stored. The size of your virtual disk should be mention next. usually it will be of 8GB, but you can change it.
Click next, after you select the proper filed entries.
   10.

Oh my God, its over!. The next window will show the summary of what and all changes we did in VirtualBox settings. Verify it and click on Create button. This will Start creating the virtual disk. you will get the following window, which shows the progress. wait till it completes.


   11.
This create the virtual disk in the specified path. Be sure to look at the path to confirm the disk presence(where else it will go? :p).If everything is perfect, then the Oracle VM VirtualBox Manager window shown the name of the disk as below.


Yippee we completed the first step successfully!

Installing a new OS to VirtualBox

The following steps demonstrate how you can install the Ubuntu 12.04 in VirtualBox.
  1.  Download the ubuntu-12.04-desktop-i386.iso image from the Ubuntu website(downloading details given in the Ubuntu site,  http://www.ubuntu.com/download/desktop itself).
     2.

Click on the settings button next to the new button which shown in the 11th step of virtual disk creation. This will pop up a new window as above. Click on storage on left side. Select the IDE --> Empty. Click on the small folder/CD image next to the CD/DVD driver attribute on the right end.
      3. Select the path in which Ubuntu .iso file is downloaded. Then the above window modified a s below

Click on Ok button. This will show the Manager widow with an additional start option! next to settings

Select the Ubuntu and click on "Start" button. This will start the Ubuntu first time configuration. This step is same as that of normal installation. Check out the following link for more information regarding the instalation

Wait for the boot-up and finish the regular installation procedure. If everything goes well, then our Ubuntu will be invoke after that

Yes..Our second step also made successfully! Now it's your turn...try what ever you want in Linux...enjoy the world of Open Source....
    4. 

Once you click on the close button of the window, the VirtualBox gives a prompt with 3 options. It's up-to the user to select the suitable option according to the need. Once the option is selected, click OK.
this will do the selected option and returned to the Oracle VM VirtualBox Manager window.


Happy coding...Happy life....
T25RSS2ZMMA5